AI links open with a title + excerpt (these tools can't fetch the page themselves) — use "Copy full article" to paste the complete text for a fuller summary.
Introduction
This article demonstrates working with MVC using Angular Bootstrap Nav Tree.
Angular Bootstrap Nav Tree
The style is completely bootstrapped because the tree is actually just a “nav” list, with a few changes.
- Added
- Expand/Collapse
- Angular animations are used during expand/collapse.
The abn-tree directives now work with Bootstrap 2 and Bootstrap 3. You can change the icons used by specifying them in HTML attributes. Follow the steps below to use Angular Bootstrap Nav Tree in Angular JS in MVC.
- Create MVC Project.
- Configure Angular Bootstrap Nav Tree.
- Work in Angular Bootstrap Nav Tree.
Create MVC Project
Open Visual Studio 2017.  Go to New > New > Project. Now, it will open New Project window.
 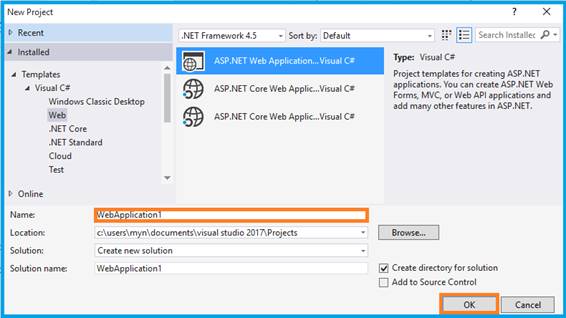 Select ASP.NET Web Application on Framework 4.5. Enter the name of the project in the “Solution name” textbox and click OK.
 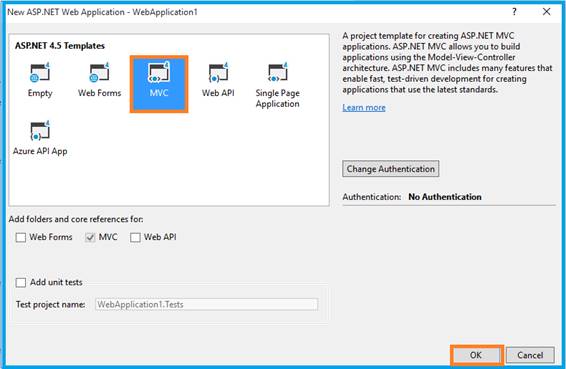 One more window should appear. Select MVC Template in this popup and click OK. Now, we can start the play.
Configure Angular Bootstrap Nav Tree
You can download the plug-in from:
Open the _Layout.cshtml and refer to the .js files from your downloaded folder to view this page.
Link your Angular configurable file.
Angular Module
You need to include the module as a dependency in your application.
var uiroute = angular.module('uiroute', ['ui.router','angularBootstrapNavTree']);
Work in Angular Bootstrap Nav Tree
This tree control will work when you use the
HTML Code
Tree Control API:
Angular Controller
var treedata_geography = [ { label: 'North America', children: [ { label: 'Canada', children: ['Toronto', 'Vancouver'] }, { label: 'USA', children: ['New York', 'Los Angeles'] }, { label: 'Mexico', children: ['Mexico City', 'Guadalajara'] } ] }, { label: 'South America', children: [ { label: 'Venezuela', children: ['Caracas', 'Maracaibo'] }, { label: 'Brazil', children: ['Sao Paulo', 'Rio de Janeiro'] }, { label: 'Argentina', children: ['Buenos Aires', 'Cordoba'] } ] } ];
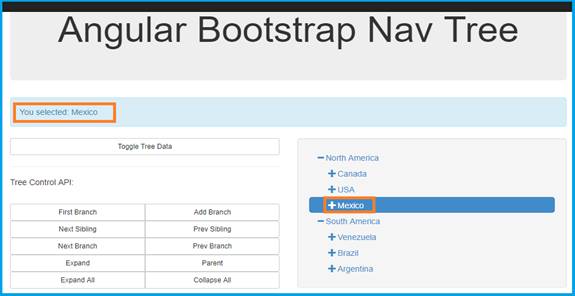
Click F5 button to Run the application. Now, it will open the browser where you can see the result. It will load geographic data and on-select change shows the selected result at the top of the page.
Output 1
Angular Controller
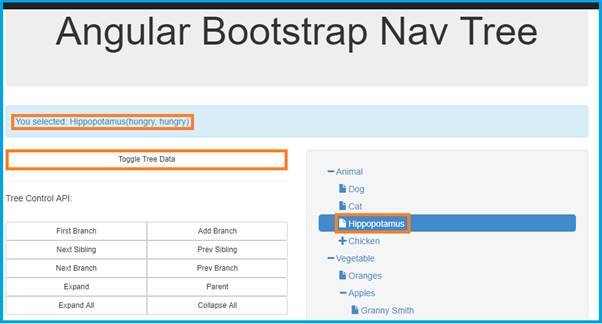
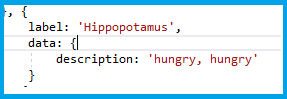
var treedata_avm = [ { label: 'Animal', children: [ { label: 'Dog', data: { description: 'man\'s best friend' } }, { label: 'Cat', data: { description: 'Felis catus' } }, { label: 'Hippopotamus', data: { description: 'hungry, hungry' } }, { label: 'Chicken', children: ['White Leghorn', 'Rhode Island Red', 'Jersey Giant'] } ] }, { label: 'Vegetable', data: { definition: 'A plant or part of a plant used as food, typically as accompaniment to meat or fish, such as a cabbage, potato, carrot, or bean.', data_can_contain_anything: true }, onSelect: function (branch) { $scope.output = 'Vegetable: ' + branch.data.definition; return $scope.output; }, children: [ { label: 'Oranges' }, { label: 'Apples', children: [ { label: 'Granny Smith', onSelect: apple_selected }, { label: 'Red Delicous', onSelect: apple_selected }, { label: 'Fuji', onSelect: apple_selected } ] } ] }, { label: 'Mineral', children: [ { label: 'Rock', children: ['Igneous', 'Sedimentary', 'Metamorphic'] }, { label: 'Metal', children: ['Aluminum', 'Steel', 'Copper'] }, { label: 'Plastic', children: [ { label: 'Thermoplastic', children: ['polyethylene', 'polypropylene', 'polystyrene', ' polyvinyl chloride'] }, { label: 'Thermosetting Polymer', children: ['polyester', 'polyurethane', 'vulcanized rubber', 'bakelite', 'urea-formaldehyde'] } ] } ] } ]; cope.try_changing_the_tree_data = function () { if ($scope.my_data === treedata_avm) { $scope.my_data = treedata_geography; } else { $scope.my_data = treedata_avm; } return $scope.my_data; };
You can load the data dynamically in Nav Tree. When you click on 'toggle tree data,' it shows the description of the label.
Output 2
Angular Controller
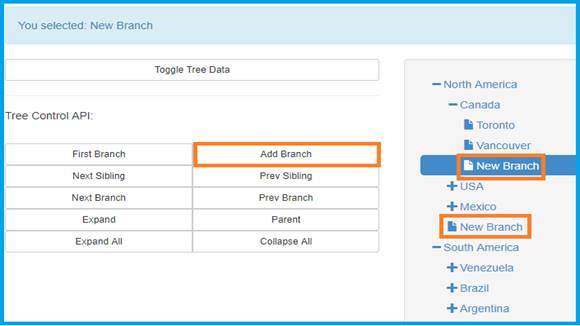
$scope.try_adding_a_branch = function () { var b; b = tree.get_selected_branch(); return tree.add_branch(b, { label: 'New Branch', data: { something: 42, 'else': 43 } }); };
You can add the new branch on that tree in any of the nodes.
Output 3
 Note Other events are already predefined.
Conclusion
In this article, we have learned how to create an MVC application using Angular Bootstrap Nav Tree. If you have any queries, please tell me via the comments section. Your comments are very valuable. Happy Coding!
Comments
Be the first to comment.